一、概念介绍
简单来说git fetch命令用于将远程仓库的最新内容拉到本地,用户在检查了以后决定是否合并到本地分支中。
但是我们要搞清楚,fetch操作并不会更新你本地仓库的代码。我的理解也有点模糊,这么说,可以理解为本地保存有两个分支,一个是本地分支,就是工作的那个master;另一个则是本地远程分支,fetch拉取的内容就保存在这里。
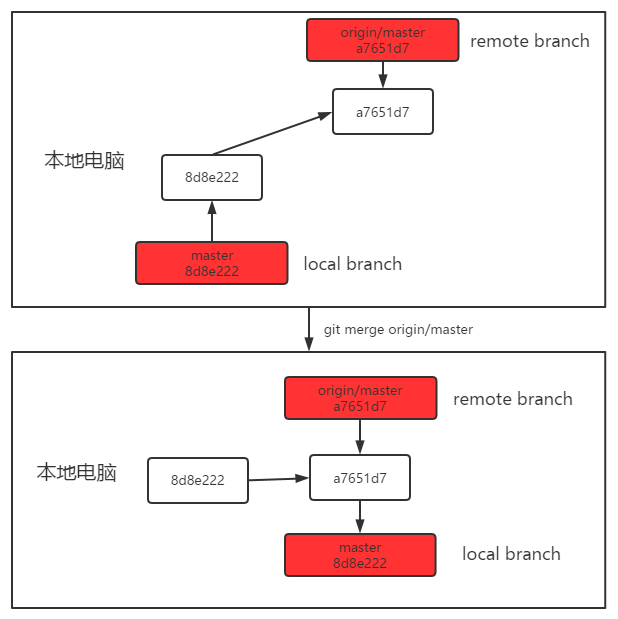
要想更新本地代码为远程仓库最新内容,我们要进行fetch获取最新内容保存到本地远程分支,然后merge操作将本地远程分支内容合并到本地master分支中完成更新。
而git pull 则是将远程主机的最新内容拉下来后直接合并,即:git pull = git fetch + git merge,这个命令简单粗暴下面就不着重讲解了,我们重点是fetch+merge这种更新本地代码的方法。
二、图解+实例演示理解远程分支和本地分支概念
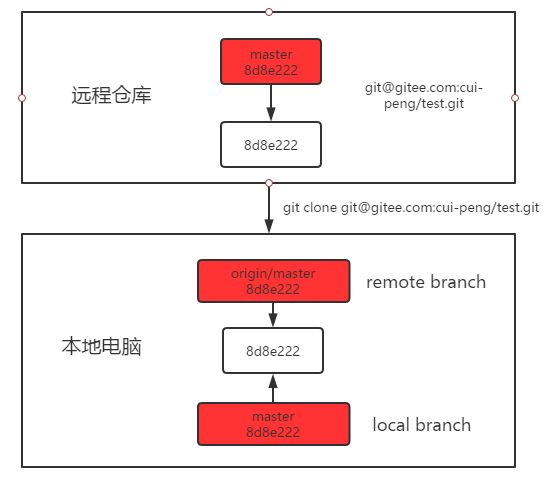
假设我们在gitee上有一个名为test的仓库。直接克隆到本地,Git 的 clone 命令会自动将仓库地址命名为 origin,拉取它的所有数据,创建一个指向它的 master 分支的指针,并且在本地将其命名为 origin/master(本地远程分支)。 Git 也会给你一个与 origin 的 master 分支在指向同一个地方的本地 master 分支,这样你就有工作的基础。

[root@git ~]# git clone git@gitee.com:cui-peng/test.git
[root@git ~]# cd test && ll
total 4
-rw-r--r--. 1 root root 5 Jun 19 04:39 index.html
[root@git test]# cat index.html
test
[root@git test]# git branch -av                         //查看分支和远程分支
* master                8d8e222 create test file
  remotes/origin/HEAD   -> origin/master
  remotes/origin/master 8d8e222 create test file
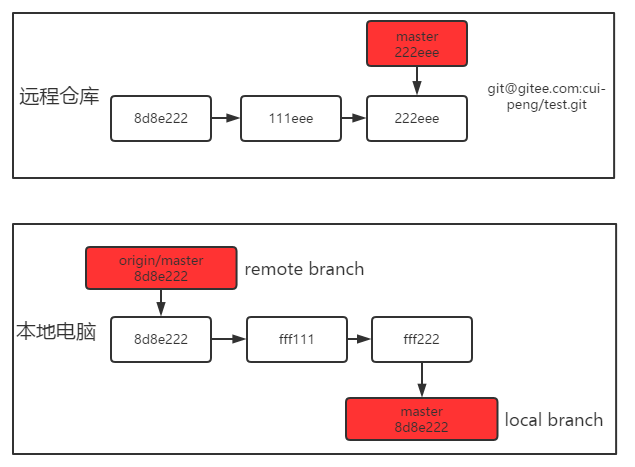
值得一提的是,如果你在本地的 master 分支做了一些工作,在同一段时间内有其他人更新了远程test仓库,只要你不使用git fetch命令拉取远程仓库内容,你的 origin/master 指针就不会移动,本地远程分支还是8d8e222版本,而master则是fff222版本了。

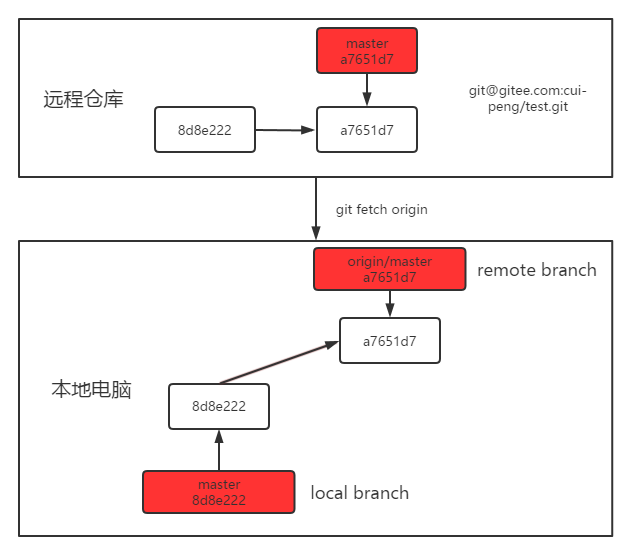
假设此时有其他人更新了test仓库内容,那么本地如何更新。首先我们需要使用git fetch命令同步远程仓库内容到本地远程远程分支。同步之后此时已经产生分叉了,本地远程分支origin/master是一个版本,本地工作分支master是一个版本,但是本地远程分支并不会影响本地分支代码,所以此时本地代码不变,所以本地电脑的8d8e222版本和a7651d7版本不在一条线上。

[root@git test]# git fetch origin                               //同步远程仓库数据
remote: Enumerating objects: 5, done.
remote: Counting objects: 100% (5/5), done.
remote: Total 3 (delta 0), reused 0 (delta 0), pack-reused 0
Unpacking objects: 100% (3/3), done.
From gitee.com:cui-peng/test
   8d8e222..a7651d7  master     -> origin/master                //可以看到内容保存到了本地远程分支
[root@git test]# cat index.html                         //此时我们看下本地代码是否有所改变
test
[root@git test]# git branch -av                         //我们可以看到本地远程分支内容已经发生了改变
* master                8d8e222 [behind 1] create test file
  remotes/origin/HEAD   -> origin/master
  remotes/origin/master a7651d7 first test
[root@git test]# git diff origin                        //对比变化
diff --git a/index.html b/index.html
index 7cc6cd7..9daeafb 100644
--- a/index.html
+++ b/index.html
@@ -1,2 +1 @@
 test
-test-first
\ No newline at end of file[root@git test]# git merge origin/master //将本地远程分支合并到本地分支
Updating 8d8e222..a7651d7
Fast-forward
index.html | 1 +
1 file changed, 1 insertion(+)
[root@git test]# cat index.html //此时可以看到本地代码已经更新了
test
test-first
[root@git test]# git branch -av //可以看到两个分支位于同一版本了
* master a7651d7 first test
remotes/origin/HEAD -> origin/master
remotes/origin/master a7651d7 first test
三、问题
当我们使用fetch命令拉取指定分支的更新时,会出现下面问题。
[root@git test]# git fetch origin master
remote: Enumerating objects: 5, done.
remote: Counting objects: 100% (5/5), done.
remote: Total 3 (delta 0), reused 0 (delta 0), pack-reused 0
Unpacking objects: 100% (3/3), done.
From gitee.com:cui-peng/test
 * branch            master     -> FETCH_HEAD

             //这里我们发现没有将拉取的内容保存到本地远程分支中,而是返回一个FETCH_HEAD。

[root@git test]# git branch -av
* master                a7651d7 first test
  remotes/origin/HEAD   -> origin/master
  remotes/origin/master a7651d7 first test

            //查看一下,发现确实没有发生变化,那么此时我们像上面实例样按流程进行merge操作时,会有什么结果呢。

[root@git test]# git merge origin/master            //提示已经是最新的了
Already up-to-date.
[root@git test]# cat index.html                     //查看文件发现代码并没有变化
test
test-first
[root@git test]# git branch -av
* master                a7651d7 first test
  remotes/origin/HEAD   -> origin/master
  remotes/origin/master a7651d7 first test
如何解决,首先我们要理解什么是FETCH_HEAD,它指某个branch在服务器上的最新状态,我们可以在本地通过它查看刚取回的更新信息。
[root@git test]# git log -p FETCH_HEAD
commit 9ec46677574c93ccfc8b6ae535b6dfc6615e6938
Author: 崔* <**_work@163.com>
Date:   Fri Jun 19 17:59:08 2020 +0800

    second test

diff --git a/index.html b/index.html
index 7cc6cd7..140d787 100644
--- a/index.html
+++ b/index.html
@@ -1,2 +1,3 @@
 test
-test-first
\ No newline at end of file
+test-first
+test-second
\ No newline at end of file
.........
既然如此,我们也可以通过它去更新本地代码
[root@git test]# git merge FETCH_HEAD             //将取回的最新内容合并到当前所在的分支中
Updating a7651d7..9ec4667
Fast-forward
 index.html | 3 ++-
 1 file changed, 2 insertions(+), 1 deletion(-)
[root@git test]# cat index.html
test
test-first
test-second
[root@git test]# git branch -av
* master                9ec4667 [ahead 1] second test
  remotes/origin/HEAD   -> origin/master
  remotes/origin/master a7651d7 first test
上面更新本地代码的操作可以等价于pull,即:git pull origin master = git fetch origin master + git merge FETCH_HEAD
[root@git test]# git pull origin master
remote: Enumerating objects: 5, done.
remote: Counting objects: 100% (5/5), done.
remote: Total 3 (delta 0), reused 0 (delta 0), pack-reused 0
Unpacking objects: 100% (3/3), done.
From gitee.com:cui-peng/test
 * branch            master     -> FETCH_HEAD
Updating 9ec4667..feef2d0
Fast-forward
 index.html | 3 ++-
 1 file changed, 2 insertions(+), 1 deletion(-)
[root@git test]# cat index.html
test
test-first
test-second
test-third[root@g
[root@git test]# git branch -av
* master                feef2d0 [ahead 2] third test
  remotes/origin/HEAD   -> origin/master
  remotes/origin/master a7651d7 first test
四、其它
(1)拉取其它分支
[root@git test]# git fetch origin cc:cc
From gitee.com:cui-peng/test
 * [new branch]      cc         -> cc
这个命令意思是从远程仓库拉取cc分支内容,如果本地不存在cc分支, 则会自动创建一个新的cc分支保存拉取的内容;如果本地存在cc分支, 并且是" fast forward ", 则自动合并两个分支, 否则, 会阻止以上操作。
fast foward是什么意思呢?要知道提交到远程仓库的代码必须是按照一定的顺序来,即远程仓库的最新提交版本是本地分支的上一个版本。假设你从远程仓库获取到代码,对某某文件进行了修改,然后push到远程仓库。但是其他人在你之前就拿到了远程仓库的代码,在你push成功之后也对同样文件进行了修改,这个时候他也运行push命令推送代码。
因为你们都是基于同一个版本开始工作的,此时会两种可能情况,一是他push时加上-f强制,则你提交的被覆盖成他的,你的提交丢失;二是他没加-f,则他的push失败。他想提交他则需要先从远程仓库获取最新的版本,此时会自动检测你本地代码和从远程仓库拉取的是否冲突,冲突则合并失败,反之成功。
注意,fetch也是如此。
注意:git 1.8.4 (August 2013)版本之前,git fetch origin master确实不会在本地更新本地远程分支;
但在git 1.8.4版本之后,将会更新远程本地分支。详见:https://github.com/git/git/commit/f269048754f3b835f4f7287c5a132714a059efce